Tag: comfort food

  • Chicken Shawarma Dinner


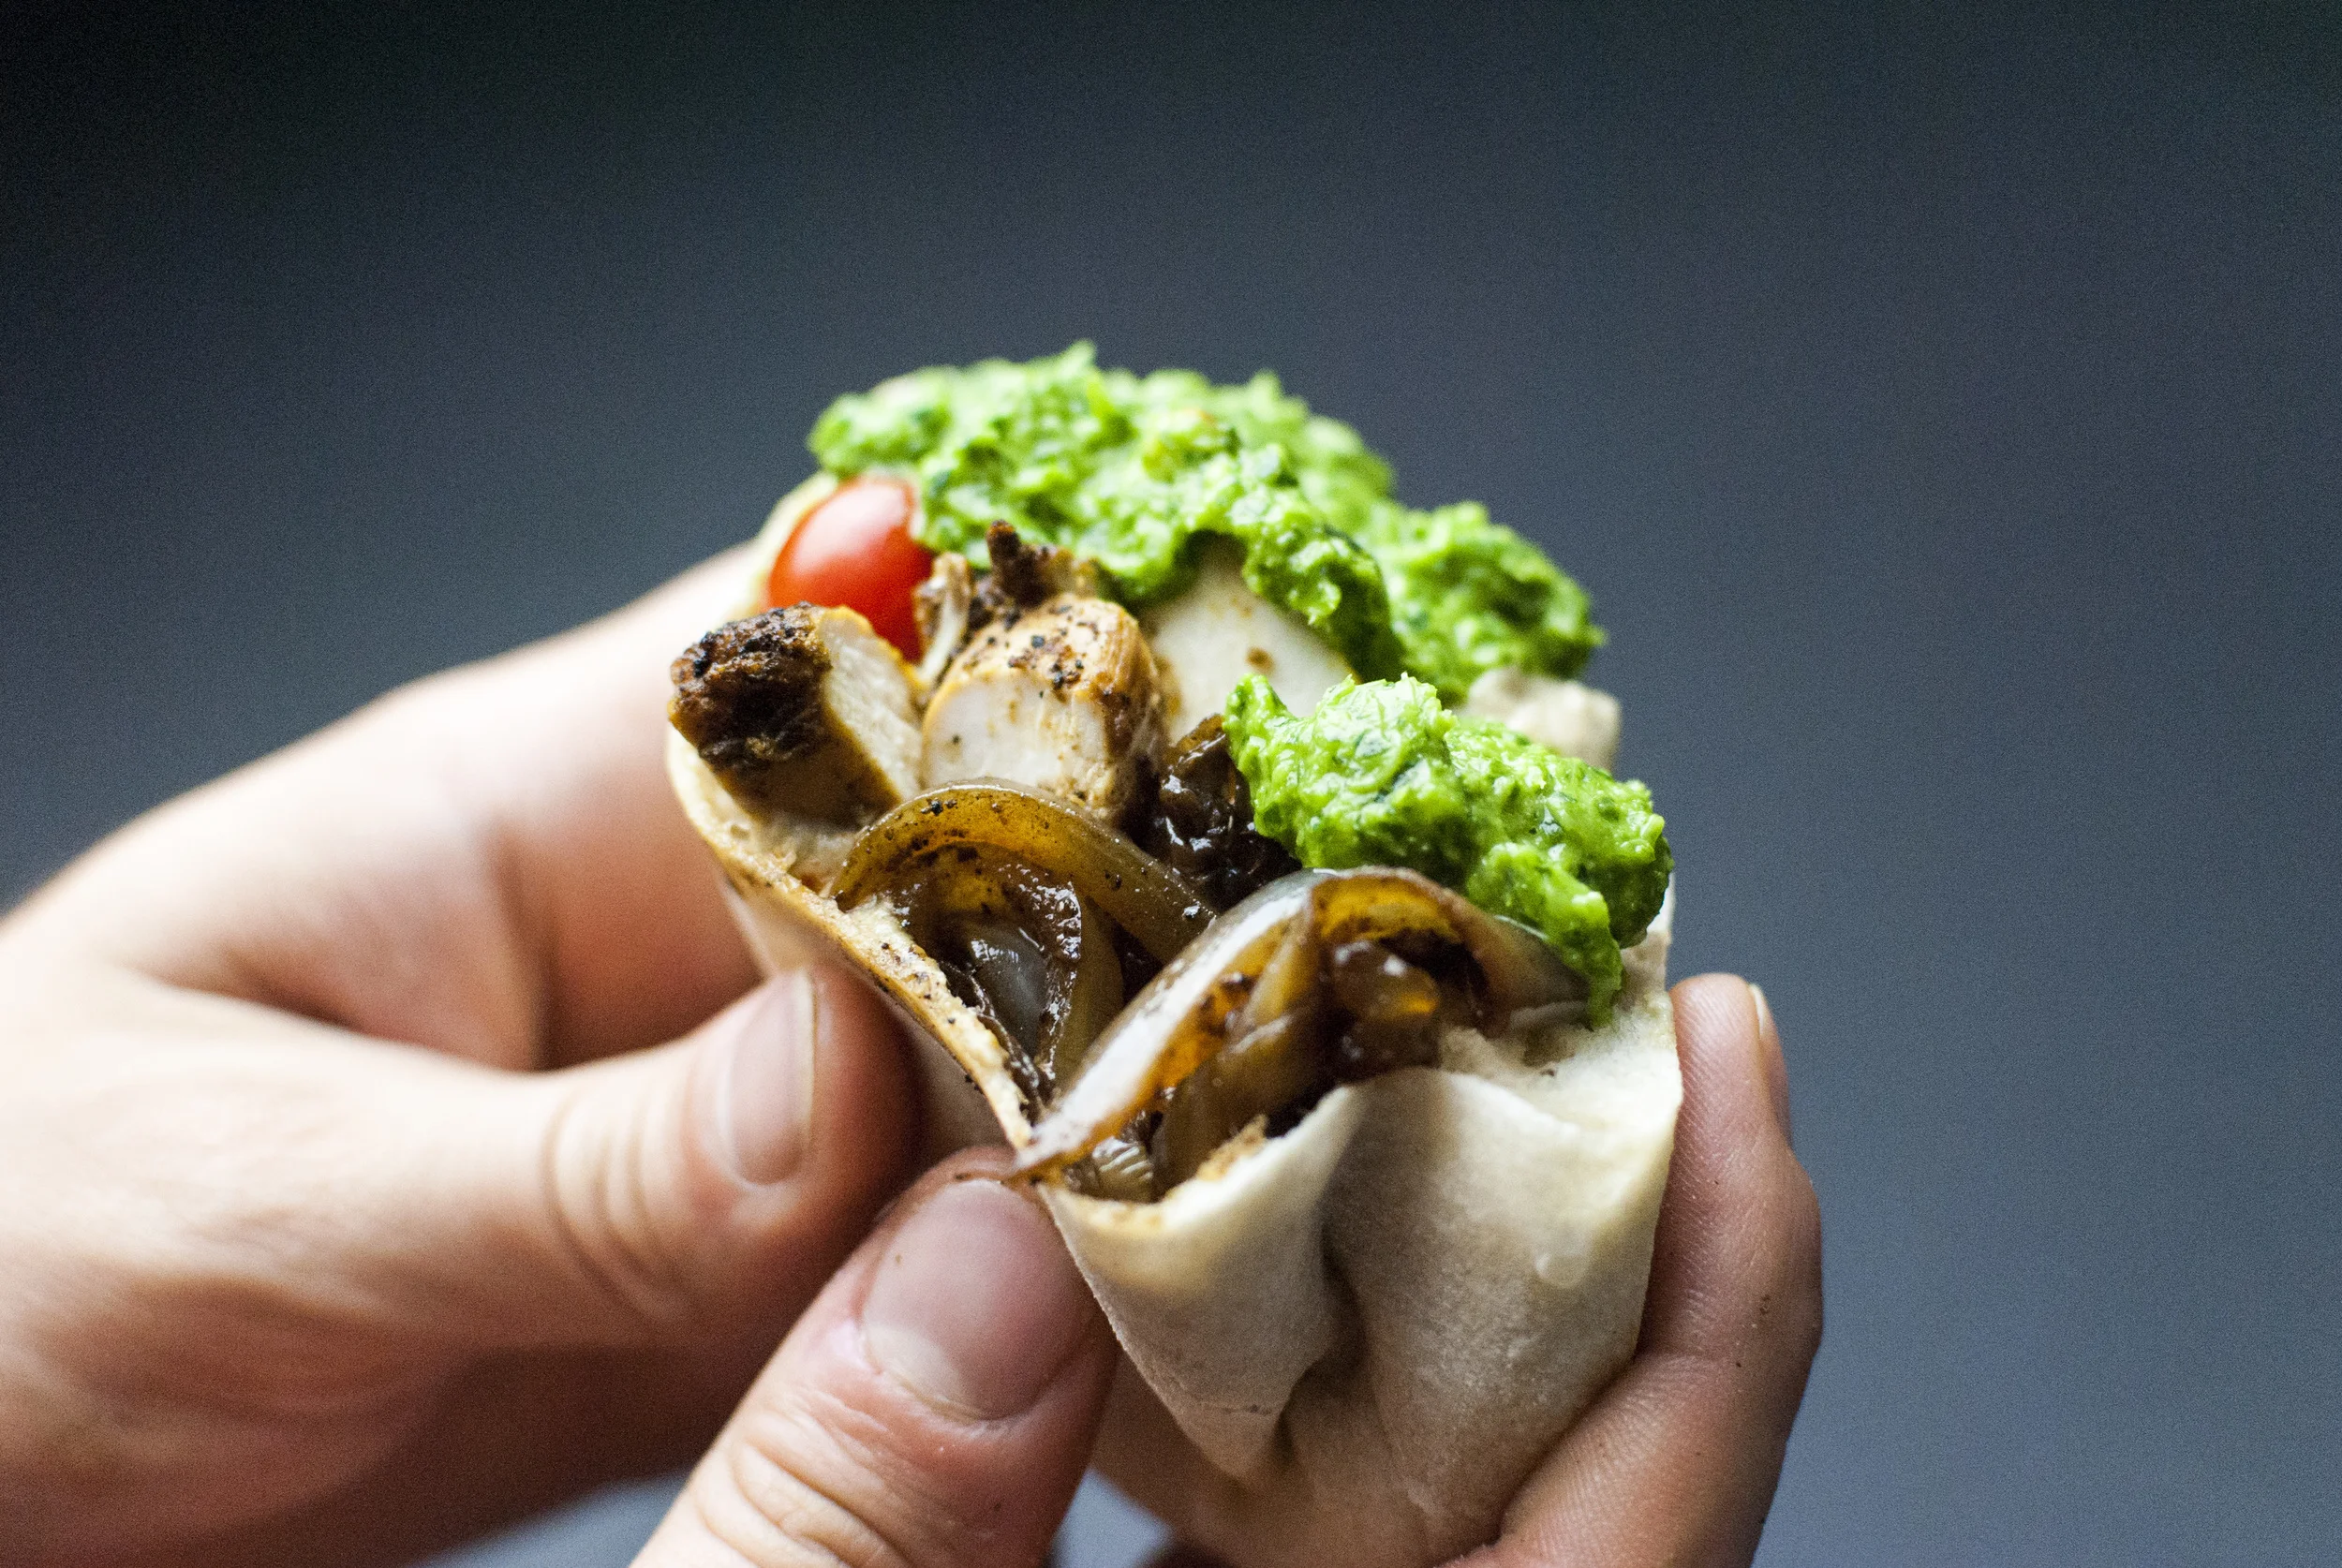
    First and foremost, this is a multi-recipe post! Nothing here is too complicated, and when you make (and eat) all these things together, the result is immensely satisfying; it’s a favorite weeknight—yes, weeknight—spread for us. This is a dinner that really exemplifies some of our favorite flavors: bold spices, fresh herbs, and obscene amounts of garlic. While we understand that this recipe might not be exactly authentic (it isn’t), we can promise that it’s completely delicious. The styles of shawarma, after all, are completely dependent on what’s around and what’s good, and we used what was in our pantry. We can also promise that this is one of the easiest and quickest smorgasbords you can make to impress a small crowd. It makes a great sit-down meal, but also could promote casual grazing at a party. We’ve tried it both ways: 10/10, would recommend.

    The zhoug was inspired from the Jerusalem cookbook, and has since found its way into many dinners of ours. Call us predictable, but we are suckers for fresh and spicy sauces that brighten things up.

    Parsley and Mint Zhoug:

    • 1 cup of fresh parsley leaves, packed, some stems are okay
    • ½ cup fresh mint leaves, packed
    • 2 cloves of garlic, crushed
    • 2 green chiles, stems removed
      • Note: You can use whatever green chiles might be available to you for this such as jalapeños or serranos. We love using Thai chiles, and for this particular recipe we us 4–5. It all depends to how spicy you want this condiment to be.
    • 1 heaping teaspoon of ground cumin
    • Juice of 1 lemon, seeds removed
    • ¼ cup olive oil
    • Salt to taste

    Combine parsley, mint, garlic, chiles, cumin, and lemon juice in a food processor and pulse the ingredients together, occasionally scraping the sides of the bowl. Once the mixture resembles a thick paste, keep the blade running and pour in the olive oil through the top slowly, creating an emulsion. Season with salt and double check the mixture for smoothness, pulsing occasionally if needed. Serve in a small serving bowl.

    Chicken Shawarma:

    • 1 pound of chicken breasts, trimmed of silver skin
    • Kosher salt
    • Shawarma spice mix:
      • 1 tablespoon ground cumin
      • 2 teaspoons curry powder
      • 1 teaspoon ground coriander
      • 1 teaspoon sumac
      • 1 teaspoon paprika
      • ½ teaspoon ground allspice
      • ¼ teaspoon ground cinnamon
      • ¼ teaspoon ground ginger
    • Oil as needed
    • ½ large sweet onion, thinly sliced into strips


    Rinse the chicken pat dry with a paper towel. Fillet meat into pieces with even thicknesses; about an inch. Cover one side of the meat liberally in salt and spices and set aside.

    Bring a pan to medium high heat with half a tablespoon of oil or so and place the chicken in the pan. As the meat cooks, salt and cover the other side with salt and spices. Cook until the chicken starts to whiten up the sides, then flip to finish cooking. Test the chicken for doneness (160-165°F) then remove from the pan to rest for 10 minutes before serving. While the chicken rests, add the onions to the pan and a little bit of water to help the drippings from the pan release. Cook onions until they become soft, translucent, and have sopped up all the drippings. Remove from the pan and serve.

    Serve with pita, hummus, baba ghanouj, and, if you can swing it, throw together a two second Greek salad.

    Serves 4.


  • Smashed Raspberry Grilled Cheese


    Our challenge of savory seasonal eating continues!

    Raspberry season is upon us, and we quickly discovered through our research process that there’s not a whole lot of savory raspberry recipes out there, which we found simultaneously disappointing and alluring. We found plenty of jams, jellies, cookies, pavlovas (Christ, so many pavlovas) and cakes, but no one seemed interested in figuring out how raspberries could make their way out of the realm of dessert.

    But if there’s a way to make something savory, we will find it. As usual, the key was cheese.

    Grilled cheese sandwiches are essentially a step below pizza ingredient-wise, so they’re near the top of the favorite food list for us. Few things can compare to crisp and thickly sliced rustic bread (Nate makes the best) with melted cheese. However, there is one thing that these sandwiches usually lack to create what is more commonly accepted as a “complete taste” on its own, and that’s acid. That’s why you see grilled cheese and tomato soup paired together all over the place.

    So we thought…why not switch up the acid?


    Berries and cheese go way back, so we weren’t too scared about them intermingling. Our acidic subject? Fresh raspberries. Our cheese? We eventually decided to go with a blend of chèvre for flavor and Jarlsberg for texture. So we smashed some raspberries we got from Sauvie Island Farms after a lovely day of berry picking onto some of Nate’s homemade 50% whole wheat sourdough bread and got cooking.

    The results? Crunchy, fluffy, creamy, gooey, and tart. It was everything we hoped it would be and more. If you have any fruit laying around, especially incredibly fresh fruit, we wholeheartedly recommend you put your thinking cap on and find a cheese that’ll pair well with it, then immediately stuff it in a grilled cheese sandwich. You will not be disappointed. Sometimes it really is the simplest things that taste the best.

    Smashed Raspberry Grilled Cheese Sandwich:

    Makes 1.

    • 2 thick slices of good rustic bread (whole wheat sourdough was magical with this, but if you wanna try something else, it’ll still turn out awesome)
    • About 1 tablespoon of butter, room temperature
    • 8–10 ripe raspberries (enough to cover the surface of one piece of bread)
    • 2 ounces of Jarlsberg cheese, grated
    • 1 ounce chèvre, room temperature
    • A dash of freshly ground black pepper

    In a small bowl, mix the grated Jarlsberg and chèvre together along with the fresh black pepper. Set aside.

    Butter both pieces of bread on one side using ½ a tablespoon of butter each. On the unbuttered side of one of your pieces of bread, lay out your raspberries and smash them with a fork, moving the juices around until the entire surface of the bread is covered. Spoon the cheese mixture on top of the smashed raspberries and spread it until the cheese covers the surface of the bread. Put the other piece of bread on top, buttered side up.

    Preheat a non-stick pan on medium heat and put the sandwich in the pan. Allow each side to cook for roughly four minutes, adjusting heat as needed to cook the sandwich through, or until each side of the bread is golden brown and the cheese is melted. To help the melting process along, you can put a lid on the pan, keeping the heat trapped in, though you should limit this because you will lose that deep crispness with too much steam.

    Allow sandwich to cool, then go to town.


  • Fresh Strawberry Ice Cream


    Oregon’s berry bounty is impressive, especially in the summer. Wave after wave of variety comes into its own and it can seem overwhelming when the time comes to choose which one to work with, but after much deliberation, Nate and I think that we’ve finally decided on what our favorite is.

    Is it the plentiful, tart, and quintessential Pacific Northwestern blackberry?

    No.

    Is it the delicate, elegant, and high-brow dessert-loving raspberry?

    No.

    Is it the versatile, delicious, and nutritious blueberry?

    No. No it is not.


    For us, the most sublime berry is the one that welcomes us into the warmer months in Oregon. Hitting their peak in early summer, their season comes and goes quickly. It’s important to get them while you can because, as summer develops, they just aren’t the same anymore, then they disappear altogether, waiting for late spring once again. We are, of course, talking about what might be the most popular berry in America: the strawberry.

    One might think to oversimplify this common ingredient; after all a strawberry is a strawberry is a strawberry, right?

    Noooooope.

    There are so so many species of these little beauties, and they all taste a little different from one another. However, there are two that rise above the rest for us: Hoods and Seascapes. I’d be impressed if anyone went wrong with either one of them if you get them at the right time, and the time is now, but as this recipe suggests, like so so many things in this world, we believe that they should be drowned in cream and churned.

    P.S. This fresh fruit ice cream proportion works magic with these strawberries, but don’t let that stop you from getting creative. If you apply the same amount of any fresh fruit into this recipe, it will work. Let this be a way for you to experience all the best fruit this summer. I mean, that’s what we will be doing…

    Fresh Strawberry Ice Cream:

    • About 1½ cups (335 grams) fresh, ripe strawberries, tops removed (Hoods or Seascapes if you can get them)
    • A pint (472 grams) heavy whipping cream
    • 1¼ cups (263 grams) whole milk
    • ¾ cup plus 1 tsp (161 grams) sugar
    • Scant ¼ cup (67 grams) light corn syrup
    • A dash xanthan gum

    Blend strawberries in a food processor or using an immersion blender, then transfer into a large bowl big enough to hold all ingredients. Whisk in the cream, milk, sugar, corn syrup, and xanthan gum.

    Ready your ice cream maker (if you have a freezer bowl type make sure the bowl is completely frozen! This usually takes at least 24 hours.), and begin churning immediately. Churn for 25–30 minutes, or until the mixture resembles thick soft serve ice cream. Transfer ice cream to an airtight container, but before putting on the lid, cover it with a layer of plastic wrap, allowing it to stick to the entire surface of the ice cream. Seal the container and place in the back of the freezer for at least 4 hours prior to serving. For best consistency, freeze overnight.

    Temper about five minutes before devouring.


  • Carnitas Amargas


    The name of this dish translates to “bitter little meats.” Carnitas are a pretty standard protein in Mexican food, and why wouldn’t they be? It’s pork slow cooked in spices until it falls apart then is fried in its own fat. Sounds pretty great, right?
    We’ve made carnitas too many times to count. They’re easy, they keep well, and they also lend themselves to an incredible amount of quick and satisfying dinners. There are so many recipes for this, and it’s pretty hard to go wrong with carnitas, but we wanted to make something that stood out among the rest. So Nate had the great idea of making it taste more complex by enhancing a flavor profile that is often underrated but present in them already: bitterness.

    Initially, I was dubious. Classifying anything bitter right off the bat is often a turnoff for many. However, after he made me a first batch, I was hooked, and we’ve made them the same way ever since. Cuts of pork shoulder are coated in salt and cocoa powder then seared in a pan, then cooked in their own juices with onions, garlic, some spices, and whole lime. The result is a tasting experience in two definitive stages: fatty and salty followed by a hint of bitterness, almost even floral.

    Carnitas Amargas

    • 2 lbs pork shoulder
    • 1 tsp. cocoa powder
    • 1 tsp. salt
    • 5 cloves of garlic, peeled, whole
    • ½ yellow onion, thinly sliced
    • 1 lime, halved
    • 1 tbs. Mexican oregano
    • 1 bay leaf

    Preheat oven to 350.

    In a small bowl, mix the cocoa powder and salt together, then rub mixture over the pork. In a hot pan on medium high heat, sear all sides of the pork.

    When the pork is done searing, place it in a dutch over or clay pot (something with a cover) along with the garlic, onion, lime, Mexican oregano, and bay leaf. Cover and bake for about 2.5 hours, or until the pork is tender and falling apart. Remove from the oven and discard the lime and bay leaf. Tear the pork apart with a fork until it becomes stringy, then transfer everything in the clay pot into a hot pan (ideally the pan you used at first) and cook off all the liquid while crisping up the meat a little bit. Taste test for salt, then the carnitas are ready for use.